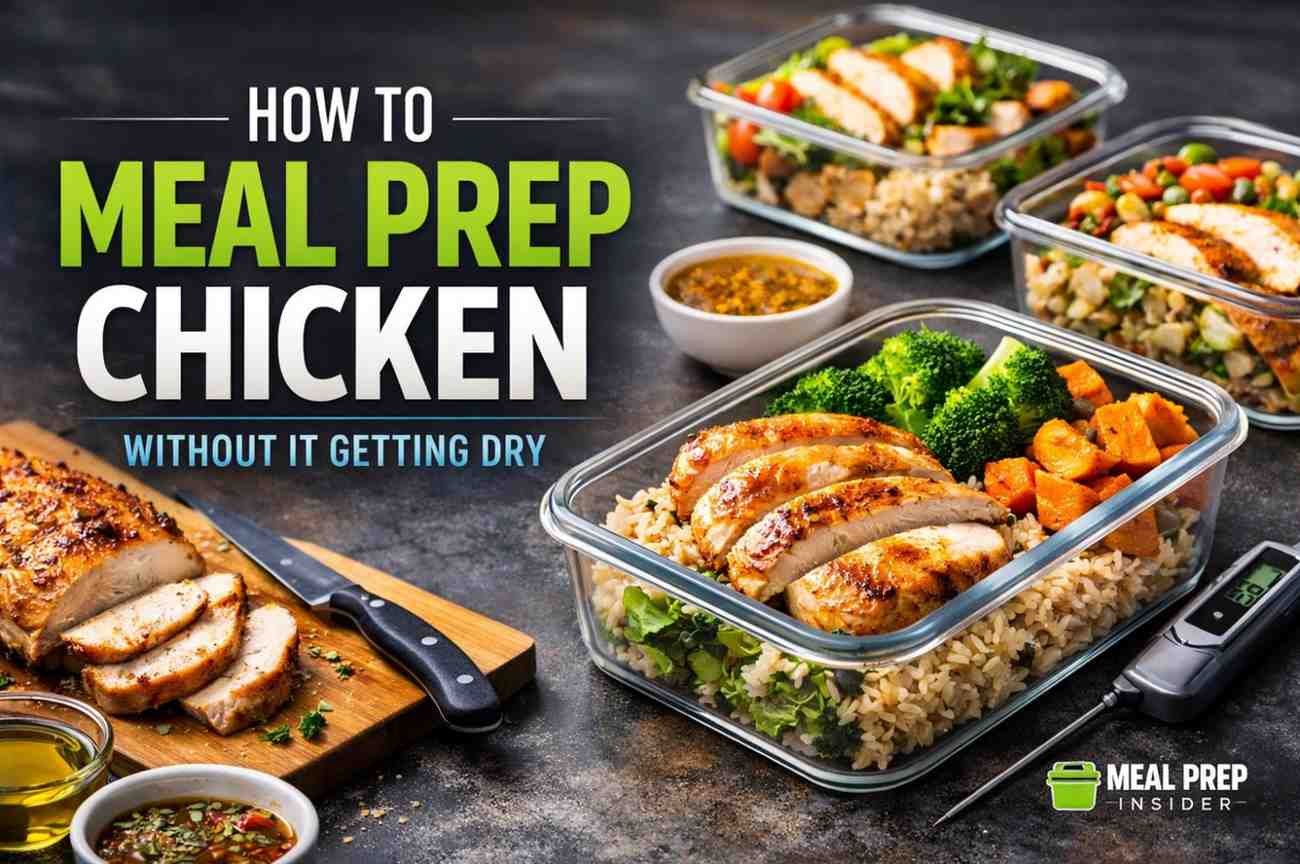
How to Meal Prep Chicken Without It Getting Dry Accurately
How to Meal Prep Chicken Without It Getting Dry: Learn foolproof methods for meal-prepping chicken without drying it out. From brining to storage hacks, get juicy, tender chicken all week long with these tested techniques that actually work.
How to Meal Prep Chicken Without It Getting Dry
You’ve been there.
Sunday rolls around. You’re pumped about meal prepping. You cook five pounds of chicken breast, portion everything into containers, and feel like a productivity king or queen. Then Wednesday hits, and you’re microwaving what tastes like a hockey puck wrapped in sadness.
Dry chicken is the number one reason people quit meal prepping altogether.
But here’s what nobody tells you: it’s not your fault. Most advice out there skips the actual science and gives you surface-level tips that sound good but don’t deliver. We’re going past the basics today. This guide covers everything from why chicken dries out in the first place to storage tricks that professional chefs use in restaurant kitchens.
Let’s fix your meal prep game permanently.
Why Chicken Gets Dry When You Meal Prep It
Before jumping into solutions, you need to understand the enemy.
Chicken breast contains about 75% water. When you cook it, proteins tighten up and squeeze out moisture. Cook it too long or at too high a temperature, and those proteins turn into tight little knots that won’t let any juice back in.
Then you refrigerate it for days.
Cold storage continues pulling moisture out through evaporation. Your chicken sits there slowly turning into jerky while you’re at work, thinking about how healthy you’re being.
The double whammy: overcooking during prep plus moisture loss during storage. That’s why your Tuesday lunch tastes nothing like the chicken you cooked on Sunday.
Most people think the solution is cooking it less. Wrong. Undercooked chicken is dangerous. The real solution involves multiple strategies working together.
The Brining Method That Changes Everything
Brining isn’t just for Thanksgiving turkey.
It’s the single most effective technique for keeping meal-prepped chicken moist. A simple brine adds moisture to the meat before cooking and changes the protein structure so it holds onto that moisture better.
Basic Wet Brine Recipe:
- 4 cups cold water
- ¼ cup kosher salt
- 2 tablespoons sugar
- Optional: garlic cloves, peppercorns, bay leaves
Mix until dissolved. Submerge your chicken for 30 minutes to 2 hours, depending on thickness. Pat completely dry before cooking.
The salt breaks down some of those tight protein bonds. Sugar adds flavor and helps with browning. The chicken absorbs extra liquid that stays put even after cooking.
Don’t have time for wet brining? Dry brining works too.
Salt your chicken and leave it uncovered in the fridge for 4-12 hours before cooking. The salt initially draws out moisture, then that salty liquid is reabsorbed along with the salt. It seasons deeply and keeps things juicy.
Use about ¾ teaspoon of kosher salt per pound of chicken for dry brining.
Cooking Temperature: The Make-or-Break Factor
Here’s where most people mess up.
They crank the heat, thinking it saves time. It doesn’t. It just ruins texture.
Chicken breast is fully cooked at an internal temperature of 165°F. But it’s actually best pulled at 160°F because carryover cooking brings it up to 165°F while resting. Going past 165°F is when things get sawdusty.
Ideal cooking temperatures by method:
| Method | Temperature | Time |
|---|---|---|
| Baking | 375°F | 20-30 min |
| Grilling | Medium heat (350-400°F) | 6-8 min per side |
| Stovetop | Medium heat | 6-7 min per side |
| Slow cooker | Low setting | 3-4 hours |
| Instant Pot | High pressure | 8-10 min |
Get an instant-read thermometer. Seriously. It’s ten bucks, and it’ll save you hundreds in wasted chicken.
Insert it into the thickest part of the breast. When it hits 160°F, pull the chicken off the heat immediately. Let it rest for at least 5 minutes.
The resting part isn’t optional. During rest, juices redistribute throughout the meat instead of running out all over your cutting board when you slice too early.
Pound It Out (No Really)
Chicken breasts are weirdly shaped.
One end is thick, the other is thin. Cook it as-is, and the thin part overcooks while you’re waiting for the thick part to hit temp.
Solution: pound them to even thickness.
Put each breast between plastic wrap or in a freezer bag. Use a meat mallet, rolling pin, or even a small heavy pan. Gently pound from the center outward until the whole breast is about ¾ inch thick throughout.
This takes like two minutes per breast. The payoff is huge. Even thickness means even cooking, which means no dry spots.
Some people butterfly their chicken instead. That works too. Slice horizontally through the middle, but don’t cut all the way through, then open it like a book. You get a thinner, more uniform piece.
SEE POST ALSO >> How to Meal Prep for the Week: High-Protein Easy Recipes
The Sous Vide Secret Weapon
If you’re serious about meal prep, sous vide is a game-changer.
You vacuum-seal or use a ziplock bag to cook chicken in a precisely controlled water bath. Set it to 150°F and cook for 1-2 hours. It literally cannot overcook. The chicken never gets hotter than the water temperature.
The texture is different. More tender than traditional methods. Some people find it too soft at first, but once you try chicken meal-prepped this way and reheated, you’ll get it.
Room-temperature reheated sous vide chicken tastes better than most people’s fresh-cooked chicken.
You can pick up a decent sous vide circulator for under $100 now. If you meal prep regularly, it pays for itself in saved food waste within two months.
Marinades vs. Moisture: What Actually Works
Marinades add flavor. They don’t add moisture.
That’s a myth that needs to die. Oil-based marinades sit on the surface. Acid-based marinades can actually make chicken mushy if left too long.
But marinades can indirectly help retain moisture.
Ingredients like yogurt, buttermilk, or mayonnaise-based marinades create a protective coating during cooking. This coating seals in juices while adding flavor.
Quick Yogurt Marinade:
- 1 cup plain Greek yogurt
- 2 tablespoons olive oil
- Juice of 1 lemon
- 3 cloves garlic, minced
- 1 teaspoon paprika
- Salt and pepper
Marinate for 2-4 hours. The lactic acid tenderizes slightly, and the yogurt keeps the outside moist during cooking.
Don’t marinate longer than 8 hours in acidic marinades. The acid starts to break down the meat’s texture in a way that’s bad for it.
Storage Techniques That Preserve Juiciness
How you store matters as much as how you cook.
First rule: Let the chicken cool to room temperature before refrigerating. Going straight from hot to cold creates condensation that makes things soggy on the outside and dry on the inside.
But don’t leave it out for more than an hour. Food safety and all that.
Storage method comparison:
| Method | Moisture Retention | Shelf Life | Best For |
|---|---|---|---|
| Airtight containers | Good | 3-4 days | Quick access |
| Vacuum sealed | Excellent | 5-7 days | Longer storage |
| Frozen in portions | Excellent | 2-3 months | Bulk prep |
| Stored in sauce/liquid | Best | 4-5 days | Maximum moisture |
The absolute best method: store your chicken in whatever sauce or liquid you plan to use to cook it.
Chicken in curry sauce, marinara, teriyaki—these stay incredibly moist because they’re literally sitting in moisture. When you reheat, the liquid rehydrates any dried surfaces.
If you’re doing plain chicken for versatile use throughout the week, store it with a tablespoon of chicken broth or olive oil in each container. That little bit of extra moisture makes a difference.
Reheating Without Ruining Everything
You did everything right up to this point. Don’t blow it during reheating.
Microwaves are convenient, but they’re moisture-destroyers. They heat unevenly and continue cooking your already-cooked chicken.
If you must microwave, use 50% power. Add a tablespoon of water to the container. Cover loosely. Heat in 30-second intervals instead of blasting it for 2 minutes straight.
Better reheating methods:
Stovetop: Add chicken to a pan with a splash of broth or water. Cover and heat on medium-low for 3-5 minutes. The steam rehydrates while heating.
Oven: Wrap in foil with a bit of liquid. Heat at 300°F for 10-15 minutes. Low and slow prevents further moisture loss.
Air fryer: Spritz with oil or cooking spray. Heat at 350°F for 3-4 minutes. This actually crisps the outside while keeping the inside moist.
The key with all methods: add moisture back in during reheating.
Choose the Right Cut (Thighs Are Cheating, and That’s Okay)
Chicken breast is lean and healthy. It’s also the hardest cut to keep moist.
Chicken thighs have more fat and connective tissue. They’re nearly impossible to dry out. If you’re meal prepping and moistness is your priority, switch to thighs.
You can overcook thighs by like 10 degrees, and they’ll still be juicy. They have dark meat flavor, which some people prefer anyway. They’re usually cheaper per pound, too.
“But thighs have more calories!”
Yeah, about 40 more calories per 4-ounce serving. If that breaks your diet, your diet has bigger problems. The difference in fat also means you’ll feel fuller longer.
Boneless skinless thighs are just as convenient as breasts for meal prep. They portion the same way and work in all the same recipes.
The Ice Bath Trick
This one’s from restaurant kitchens.
After cooking the chicken to the desired temperature, immediately plunge it into an ice bath for 1-2 minutes. This stops the cooking process instantly, preventing carryover from taking it past the perfect doneness point.
It also seals the surface, trapping juices inside.
Then dry it completely and refrigerate. The texture when reheated is noticeably better than that of chicken that has cooled slowly.
Professional caterers use this method for events where food sits for hours. There’s a reason.
Slicing Strategy Matters
When you slice the chicken, it affects how dry it gets.
Slicing exposes more surface area to air. More exposed surface means faster moisture loss during storage.
If possible, store chicken breasts whole and slice right before eating. The difference over 3-4 days is significant.
When you do slice, cut against the grain. Look at the direction of the muscle fibers and cut perpendicular to them. This shortens the fibers and makes every bite more tender, even if some moisture has been lost.
Thick slices retain moisture better than thin ones. Aim for ½-inch to ¾-inch slices rather than thin deli-style cuts.
The Butter Basting Method
This technique borrows from steak cooking.
As your chicken finishes cooking in the pan, add 2-3 tablespoons of butter. Tilt the pan and use a spoon to continuously baste the chicken with the melted butter for the last minute of cooking.
The butter adds richness and creates a protective layer that seals in moisture. When stored, this butter coating prevents the surface from drying out as quickly.
Works with olive oil, too, if you’re avoiding dairy. The principle is the same.
YOU MAY ALSO LIKE >> 15 Easy Chicken Meal Prep Recipes: Built for Busy Weeks
Consider Cooking Methods That Add Moisture
Some cooking methods add moisture during the process.
Braising: Cook chicken in liquid (broth, wine, or tomatoes) at a low temperature. The chicken absorbs flavor and stays moist. Braised chicken meal prep like a dream.
Poaching: Gently simmer in seasoned liquid. This is actually one of the best methods for meal prep chicken. It’s impossible to dry out. The downside is less browning and flavor development, but you can fix that with good seasoning in the poaching liquid.
Steaming: Less common for chicken, but totally viable. Steam keeps moisture in and prevents overcooking. Season well since you’re not getting any caramelization.
The common thread: liquid-based cooking methods naturally prevent drying.
Flavor Injecting for Deep Moisture
Turkey fryers use injectors. You can too.
A meat injector lets you add seasoned liquid directly into the chicken’s muscle before cooking. This moisture stays trapped inside, making a huge difference for meal-prepped chicken.
Basic injection liquid:
- ½ cup chicken broth
- 2 tablespoons melted butter
- 1 teaspoon garlic powder
- Salt to taste
Inject in 3-4 spots per breast. Cook as normal. The internal moisture prevents drying even after storage.
Meat injectors cost about $15. One-time purchase that permanently upgrades your meal prep.
Weekly Meal Prep Schedule Strategy
Don’t cook all your chicken on Sunday.
Cook half on Sunday, half on Wednesday. This means you’re never eating chicken older than 3 days. Fresher chicken = moister chicken, even if you do everything else right.
Or cook it all on Sunday, but freeze half. Defrost in the fridge on Wednesday morning. Properly frozen and thawed chicken retains moisture better than chicken that sat in the fridge for four days.
Batch cooking is efficient, but there’s a point where efficiency hurts quality. Find your balance.
The Science of Resting (Again, Because It’s That Important)
Resting deserves a second mention because people skip it.
When chicken cooks, heat drives moisture toward the center. If you cut immediately, all that centered moisture runs out. If you wait 5-10 minutes, it redistributes evenly throughout the meat.
For meal-prepped chicken that you’ll reheat later, proper resting means starting with maximum moisture retention. Those few minutes of patience save your entire week.
Cover loosely with foil during resting. Don’t wrap tightly, or steam builds up and makes the exterior soggy.
Common Mistakes That Guarantee Dry Chicken
Let’s list what NOT to do:
- Cooking from frozen (uneven cooking, overcooked outside)
- Using high heat to “save time” (speedrun to dry town)
- Skipping the thermometer (guessing = losing)
- Cutting into chicken to check doneness (releasing all the juice)
- Storing in containers that don’t seal (air is the enemy)
- Reheating on full microwave power (nuking nutrition and moisture)
- Meal prepping for more than 4 days (diminishing returns)
- Not seasoning until after cooking (misses the flavor penetration window)
If you’re doing any of these, stop. The results will improve immediately.
Seasoning Timing and Moisture
When you season affects moisture retention.
Salt applied right before cooking sits on the surface. Salt applied for 40 minutes to overnight (dry brining) penetrates and changes the protein structure, holding moisture better.
Other seasonings can be added at any time, but salt should be used strategically.
For meal prep, dry brine the night before cooking day. Season with other spices right before cooking. This combo gives you deep flavor and maximum moisture.
The Role of Fat in Staying Moist
Low-fat cooking sounds healthy, but it can make chicken dry.
A little bit of fat goes a long way. Brush chicken with olive oil before baking. Use a tiny bit of butter in the pan. The fat conducts heat more evenly and creates a barrier against moisture loss.
You’re talking about 1-2 teaspoons per breast. That’s about 40-80 extra calories to save your entire meal prep experience.
Worth it.
Portion Sizes and Surface Area
Larger pieces of chicken retain moisture better than smaller ones.
Simple physics: less surface area relative to volume means less moisture loss. If you’re cutting chicken into bite-sized pieces for bowls, consider keeping them larger than you normally would.
Or keep the breast whole and cut right before eating (as mentioned earlier). Whole pieces stored in sauce stay incredibly moist.
Temperature Monitoring During Storage
Your fridge temperature matters.
Fridges should run at 37-40°F. Too cold (below 37°F) and you’re basically slow-freezing the chicken, which damages cell structure and releases moisture when thawed. Too warm (above 40°F) and you’re in the danger zone for bacteria.
Get a fridge thermometer. Make sure your fridge is calibrated correctly. This affects all your food, not just chicken.
Why Your Grandmother’s Chicken Was Never Dry
Older recipes often included more fat and were cooked at lower temperatures for longer times.
Modern health trends pushed lean meats cooked quickly. Great for some things. Terrible for texture.
There’s middle ground. You can cook healthier, still-moist chicken using the techniques in this guide. But acknowledge that the leanest possible chicken cooked the fastest possible way will always be dry.
Make peace with adding back a little fat and taking a little extra time.
Frequently Asked Questions
How long does meal-prepped chicken stay good in the fridge?
Properly cooked and stored chicken lasts 3-4 days in the refrigerator. If you want to prep for a full week, cook half on Sunday and the other half on Wednesday, or freeze portions for later in the week. Always store in airtight containers and keep your fridge at 37-40°F.
Can you meal prep chicken without it smelling bad?
Yes. The “chicken smell” comes from bacterial growth and oxidation. Cook chicken to the proper temperature (165°F), cool it quickly, store it in truly airtight containers, and keep your fridge cold enough. Adding aromatics like lemon, herbs, or garlic to storage containers helps too. If chicken smells off after 2 days, your fridge is too warm, or the containers aren’t sealing properly.
Is it better to meal prep frozen or fresh chicken?
Fresh chicken gives you better control over texture, but high-quality frozen chicken works fine if thawed properly (in the fridge for 24 hours). Don’t cook from frozen unless using methods like an Instant Pot or a slow cooker. For meal prepping, you can cook fresh chicken and then freeze cooked portions, which often yields better results than cooking previously frozen raw chicken.
What’s the best way to add flavor without drying out chicken?
Dry brining (salting 4-12 hours before cooking) adds deep flavor without loss of moisture. Marinades with dairy (yogurt, buttermilk) or mayo-based sauces add flavor and protect during cooking. Storing cooked chicken in sauces keeps it moist while building flavor. Avoid long marinades in acidic ingredients (over 8 hours) as they can make the texture mushy.
Does covering chicken while baking keep it moist?
Yes and no. Covering with foil for the first half of baking traps steam and prevents the surface from drying out. Uncover for the last 10 minutes to allow browning. But covered chicken won’t develop the same caramelized exterior as uncovered. For meal prep where you’re reheating anyway, covering the entire time and skipping browning can actually yield moister results.
Can you meal prep chicken breast and chicken thighs the same way?
Mostly yes, but thighs are more forgiving. Thighs can handle higher temperatures and longer cooking without drying out due to higher fat content. They’re actually better for beginners to meal prep. Use the same storage and reheating techniques for both. Thighs stay moist even when slightly overcooked, while breasts require more precision.
Why does reheated chicken taste different than fresh?
Continued protein breakdown and moisture loss during storage change the texture and concentrate flavors. Fat oxidation creates slightly different taste notes. Reheating method matters enormously—microwaving creates a rubbery texture, while gentle oven or stovetop reheating with added liquid can make day-old chicken taste nearly fresh. Storing in sauce significantly minimizes this difference.
Should you bring chicken to room temperature before reheating?
Not necessary for food safety (cold to hot is fine), but it helps with even reheating. Chicken straight from the fridge to the microwave develops hot spots and cold spots. Letting it sit out for 10-15 minutes before gentle reheating gives more consistent results. Never leave it out for more than 2 hours.
The Bottom Line
Dry meal-prepped chicken isn’t inevitable.
It’s the result of specific mistakes that you now know how to avoid. Brine your chicken. Cook to 160°F, not a degree more. Let it rest. Store it smart. Reheat it gently.
That’s it.
You don’t need fancy equipment (though sous vide helps). You don’t need expensive cuts (though thighs are easier). You need proper technique and a thermometer.
The difference between meal prep that works and meal prep that makes you order takeout on Wednesday is usually just 5-10 degrees of overcooking and skipping the resting period.
Fix those two things alone, and you’ll see improvement.
Add brining and smart storage, and you’ll have restaurant-quality chicken all week long. The kind of chicken that actually makes you look forward to your meal-prepped lunch instead of dreading another dry, flavorless piece of protein.
Your future self will thank you. Probably while eating delicious, moist chicken on a Thursday.
SUGGESTED POST >> 17 Chicken Breast Meal Prep Ideas: Easy Weekly Edible Ideas
Discover more from Meal Prep Insider
Subscribe to get the latest posts sent to your email.