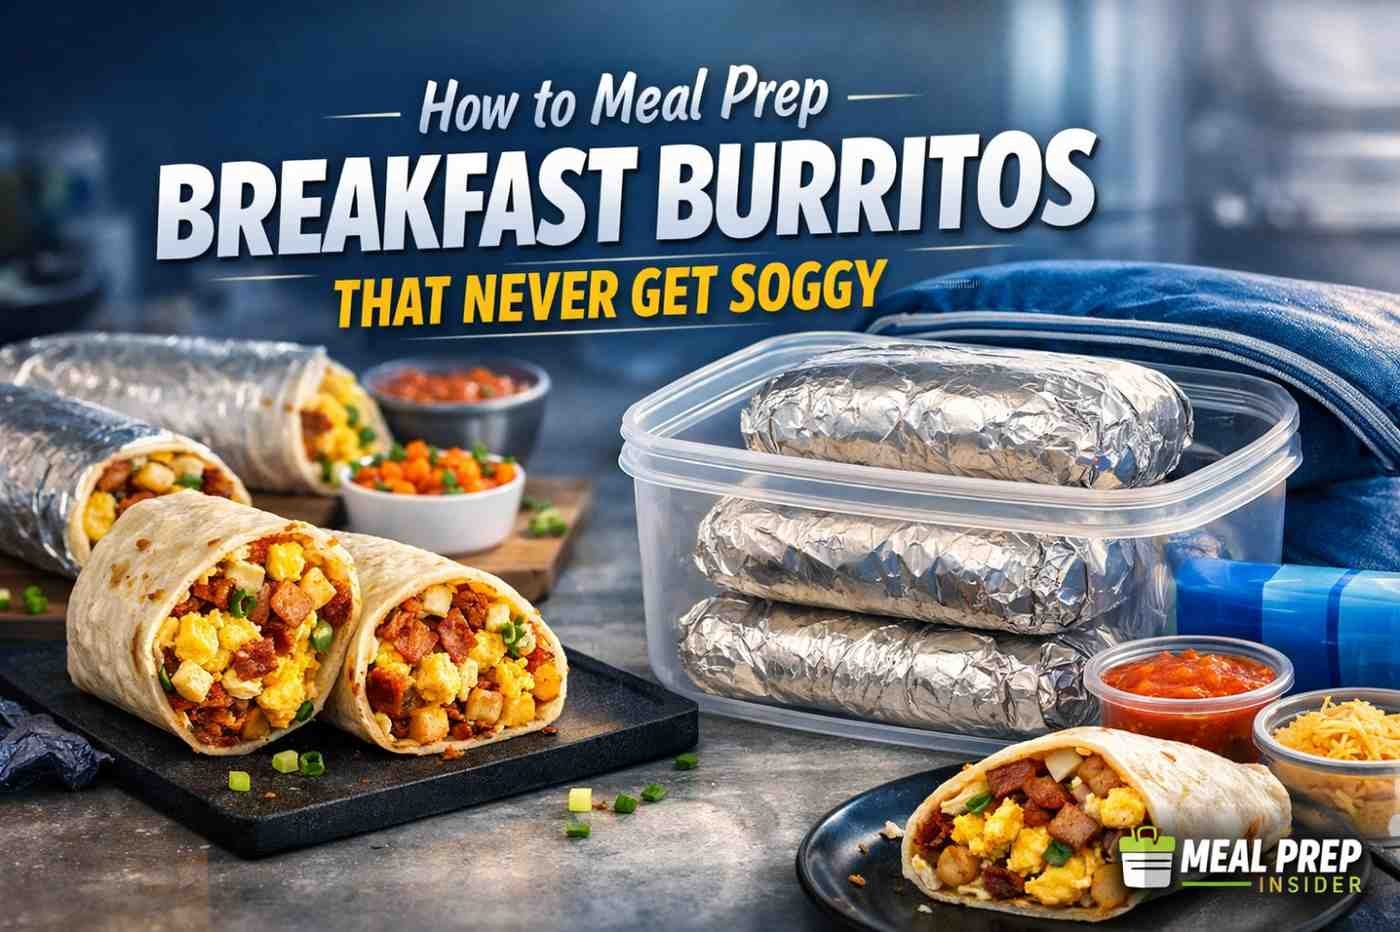
How to Meal Prep Breakfast Burritos: Learn exactly how to meal prep breakfast burritos that stay crispy, not soggy — with smart layering tricks, the right ingredients, and foolproof storage tips for busy mornings.
Why Most Meal-Prepped Breakfast Burritos Turn Into a Mess
You spent Sunday cooking. You wrapped everything up tight, stacked them in the fridge, and felt genuinely proud of yourself. Then Monday morning hits — and what you pull out is a wet, mushy, falling-apart burrito that tastes nothing like what you made.
Sound familiar?
Soggy breakfast burritos are one of the most common meal prep frustrations in American kitchens. And the fix is not complicated. You just need to understand why it happens first.
The short answer: moisture. Steam that gets trapped inside a wrapped burrito has nowhere to go. It settles into the tortilla, softens the eggs, and makes everything feel like it’s been sitting in a puddle. Some ingredients release water as they cool. Others release water when they’re reheated. Either way, your tortilla takes the hit.
The good news is that fixing this is mostly about method — not ingredients. You don’t have to give up salsa, eggs, or cheese. You just have to handle them correctly.
The Real Cause of Soggy Burritos (It’s Not What You Think)
Most people blame the tortilla. That’s only partly right.
The tortilla is the victim, not the culprit. What actually causes sogginess is a combination of:
- Underdrained ingredients — watery scrambled eggs, unsqueezed spinach, wet peppers
- Wrapping too early — trapping steam inside while everything’s still hot
- Wrong storage method — moisture condensation inside fridge containers or plastic wrap
- Poor reheating — microwaving without a paper towel or venting the wrap
Fix those four things, and you’re already 80% of the way there.
Choosing the Right Tortilla
This matters more than most people give it credit for.
Flour tortillas are the standard choice, and they work well — but not all flour tortillas are equal. Thin, flimsy ones absorb moisture faster and fall apart during reheating. You want a medium-to-large burrito-sized tortilla with some body. Mission, La Banderita, and Old El Paso all hold up decently for meal prep.
A few things to look for:
- At least 10-inch size (gives you room to wrap tightly)
- “Restaurant-style” or “burrito-size” labels tend to be sturdier
- Avoid low-carb or whole wheat varieties for meal prep — they crack when cold and go gummy when reheated
One underrated tip: lightly toast your tortilla on a dry skillet before assembling. Thirty seconds per side creates a slight barrier between the tortilla and the fillings. It’s a small step that makes a noticeable difference, especially after a few days in the fridge.
The Right Eggs for Meal Prep
Scrambled eggs are the heart of a breakfast burrito. They’re also the biggest moisture offender.
Standard scrambled eggs — made with milk or cream — release liquid as they sit. That liquid soaks directly into your tortilla. The fix is simple: cook your eggs drier than you normally would, and skip the milk.
Yes, milk makes eggs fluffier when fresh. But in a meal prep context, that added liquid is a liability.
Here’s how to cook eggs specifically for meal prep burritos:
- Crack eggs into a bowl and whisk with just a pinch of salt — no dairy
- Heat a non-stick pan on medium-low heat
- Add a small amount of butter or oil
- Pour in eggs and stir slowly, pulling them into folds
- Pull them off the heat while they still look slightly underdone — they’ll finish cooking from residual heat and won’t dry out during reheating
The texture won’t be as soft as fresh scrambled eggs right off the stove. But after storage and reheating, they’ll hold up dramatically better. Soft, over-moisturized eggs become rubbery and wet after a night in the fridge. Drier eggs maintain their integrity.
Proteins That Hold Up (and Ones That Don’t)
Not all proteins are created equal for meal prep. Some hold up beautifully. Others turn the whole thing into a regret.
Great choices:
- Breakfast sausage (crumbled) — holds texture well, low moisture, easy to cook in batches
- Bacon (crispy, not chewy) — the crispier you cook it, the better it holds after reheating
- Chorizo — slightly oily, which actually helps keep the tortilla from getting stiff without making it soggy
- Diced ham — pre-cooked, dry, reheats without releasing water
Problematic choices:
- Soft sausage patties — retain too much grease and moisture, especially if not fully drained
- Turkey sausage with high water content — check the labels; some are surprisingly wet after cooking
- Thick-cut bacon left chewy — becomes a texture nightmare after freezing
Whatever protein you use, drain it. Always drain it. Pat it down with paper towels if necessary. Any visible grease or moisture left on the protein will migrate into your tortilla over time.
Vegetables: The Sneaky Moisture Problem
Bell peppers, onions, spinach, mushrooms — these are all great in a breakfast burrito. But they are, without exception, loaded with water.
When you cook them, they release that water. If you add them to your burrito while they’re still steaming or if they weren’t cooked long enough to drive off that moisture, you’re building a time bomb.
The rule: cook your vegetables until they’re more done than you’d normally eat them. Mushrooms should be fully cooked down, not just softened. Peppers and onions should be slightly caramelized, not just sautéed. Spinach should be completely wilted and then squeezed — yes, actually squeezed — between paper towels.
It sounds like extra work. It takes maybe two extra minutes. And it makes a huge difference.
| Vegetable | What to do | Why |
|---|---|---|
| Bell peppers | Cook until slightly caramelized | Removes most water content |
| Onions | Cook until translucent to golden | Reduces sharpness and moisture |
| Mushrooms | Cook until dark and reduced | Raw mushrooms are 90%+ water |
| Spinach | Wilt fully, then press dry | Holds enormous amounts of water |
| Tomatoes | Use sparingly or omit | Very high water content |
| Jalapeños | Cook briefly or use pickled | Fresh jalapeños can release liquid |
If you love tomatoes in your burrito, use them as a topping when serving — not inside the meal-prepped burrito. The same goes for fresh salsa. These are finishing ingredients, not storage-friendly fillings.
RELATED POST >> Healthy Meal Prep Breakfast Burritos Recipe: You Can Freeze
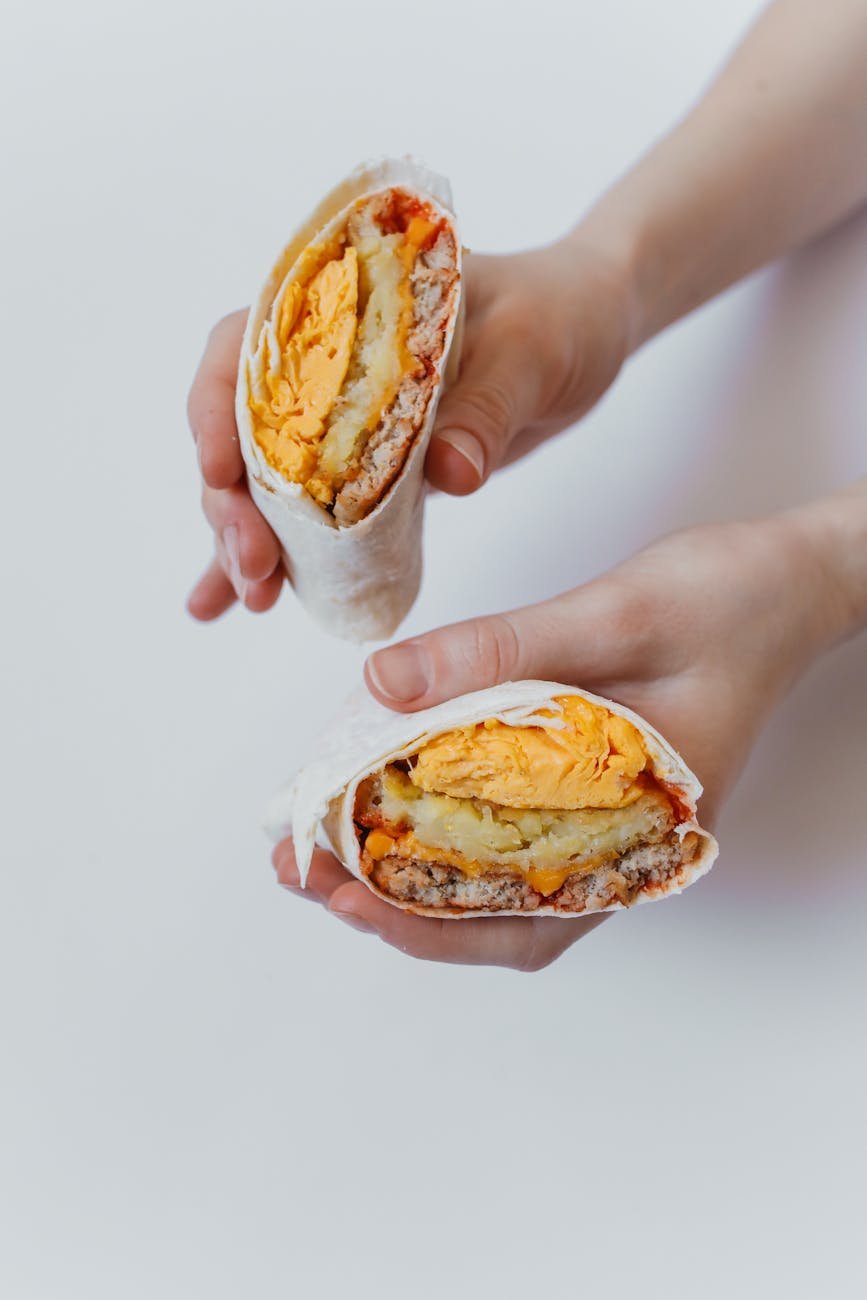
The Cheese Layer and Why It’s Actually Your Friend
Cheese does something smart in a burrito when it’s placed strategically: it creates a mild barrier.
When you place a layer of shredded cheese directly on the tortilla before adding eggs, the cheese partially melts and adheres to the tortilla. This creates a subtle buffer between the wet fillings and the bread. It’s not waterproof — but it significantly slows moisture absorption.
Use shredded cheese rather than sliced. Shredded melts faster and distributes more evenly. Cheddar, Monterey Jack, and pepper jack are all solid options. Mexican blend works great too.
The layering order matters:
- Tortilla (lightly toasted)
- Cheese — goes down first, directly on the tortilla
- Potatoes or starchy base (if using)
- Protein
- Eggs
- Vegetables
- No wet sauces inside — save those for serving
This order keeps the wettest ingredients toward the center and away from the tortilla walls.
Potatoes and Hash Browns in Meal Prep Burritos
Potatoes are excellent in breakfast burritos. They add substance, texture, and that satisfying bite that makes the burrito feel like a real meal.
For meal prep, you want your potatoes crispy. Not soft, not steamed — crispy.
Soft potatoes hold steam. Crispy ones don’t. And yes, they’ll soften a bit after storage and reheating, but starting from a crispy baseline means they land at a pleasant, tender-but-not-mushy texture when reheated.
Best methods for meal prep potatoes:
- Dice and roast in the oven at 425°F with oil, salt, and garlic powder until golden
- Pan-fry diced potatoes in a cast-iron skillet until a crust forms on the outside
- Use frozen hash browns (cooked until fully crispy) — genuinely one of the easiest options
Avoid boiling or steaming potatoes for burrito filling. Way too much moisture.
The Cooling Step Most People Skip
This one is simple. This one is critical. And almost everyone skips it.
Do not wrap your burritos while the filling is still hot.
When hot food is wrapped tightly, steam builds up inside. That steam condenses on the tortilla. The tortilla gets wet from the inside. You end up with a soggy burrito before it even hits the fridge.
Let everything cool. Not just “a few minutes” — actually cool down. Spread your fillings out on a sheet pan or large plate and let them come down to room temperature. This usually takes about 20 to 30 minutes. If you’re in a hurry, stick the pan in the fridge uncovered for 10 minutes.
Then wrap.
This single step will eliminate much of the sogginess people assume is just “how meal-prepped burritos are.” It’s not. It’s a cooling problem.
How to Wrap a Breakfast Burrito for Storage
Wrapping technique matters for both structural integrity and moisture control.
Step-by-step wrapping method:
- Lay the tortilla flat
- Add fillings to the lower-center third of the tortilla
- Don’t overfill — leave at least 2 inches on each side
- Fold the sides in first
- Roll from the bottom up, keeping it tight but not tearing the tortilla
- Immediately wrap in aluminum foil while maintaining the fold
- Press gently to shape
Foil is better than plastic wrap for storing burritos in the fridge. It allows a tiny bit of airflow while still maintaining structure and preventing freezer burn if you’re freezing them. Plastic wrap traps moisture more aggressively.
If you’re stacking multiple burritos, keep them seam-side down so they don’t unroll in the fridge.
Fridge vs. Freezer: What’s the Difference for Meal Prep?
Both work. They serve different purposes.
Fridge storage is best for burritos you’ll eat within 3 to 4 days. Wrap in foil, store in an airtight container or zip-lock bag, and you’re good. The texture is typically better from the fridge because the ingredients haven’t undergone a freeze-thaw cycle.
Freezer storage extends the life up to 3 months. It’s ideal if you’re making a big batch on Sunday for the next few weeks. Wrap tightly in foil first, then place in a labeled freezer bag to prevent freezer burn.
| Storage Method | Max Duration | Best For |
|---|---|---|
| Refrigerator | 3–4 days | Weekly meal prep |
| Freezer | Up to 3 months | Bulk batch cooking |
| Room temperature | 2 hours max | Never overnight |
One note on freezing: some vegetables — particularly peppers and onions — can get slightly watery after thawing. To minimize this, make sure they are well-cooked before freezing, as covered in the vegetable section above.
Reheating Without Ruining Everything
You did everything right. Don’t blow it here.
Microwave method (fastest): Remove the foil. Wrap the burrito in a damp paper towel. Microwave on medium power for 1.5 to 2 minutes, then flip and heat for another 30 to 60 seconds. The damp paper towel creates gentle steam that heats evenly without drying out the edges or making the center cold.
Do not microwave in foil. Do not microwave on high without the paper towel. Both methods result in either sparks or a hot-on-the-outside, cold-in-the-middle burrito.
Skillet method (best texture): Heat a non-stick or cast-iron skillet over medium heat. Place the burrito seam-side down. Press it lightly with a spatula. Heat 2 to 3 minutes per side until the outside is lightly crisped and the inside is warmed through.
This method actually improves the burrito. The outside gets a light crunch, the inside heats through, and you don’t get any of the rubbery, steamed texture that microwaving sometimes produces.
From frozen: Thaw in the fridge overnight if possible, then reheat using either method above. If reheating from fully frozen, microwave on low for 3 to 4 minutes, then finish in the skillet or continue in the microwave on medium.
A Simple Meal Prep Breakfast Burrito Recipe (Makes 6)
This is a no-frills recipe designed specifically for meal prep — not for eating immediately after cooking.
Ingredients:
- 6 large burrito-size flour tortillas
- 8 large eggs
- 1 lb breakfast sausage (crumbled)
- 1.5 cups shredded cheddar or Monterey Jack
- 2 cups frozen hash browns (cooked crispy)
- 1 bell pepper, diced small
- ½ white onion, diced small
- Salt, pepper, garlic powder
- 1 tbsp butter or neutral oil
Instructions:
- Cook the hash browns in a skillet with oil until fully crispy. Set aside to cool on paper towels.
- Cook the sausage in the same skillet, breaking it up. Drain thoroughly on paper towels.
- In the same pan, cook peppers and onions until soft and lightly caramelized. Set aside to cool.
- Whisk eggs with salt and pepper only (no milk). Scramble in butter over medium-low heat, pulling off just before fully set.
- Let all components cool on a sheet pan for 20 to 30 minutes.
- Lightly toast tortillas on a dry skillet, 30 seconds per side.
- Layer: cheese first, then hash browns, sausage, eggs, and vegetables.
- Wrap tightly in foil. Store in fridge or freezer.
Extra Tips That Actually Help
A few smaller things that don’t warrant their own section but genuinely make a difference:
- Add avocado or guac fresh — never inside a meal-prepped burrito; it turns brown and releases water
- Keep hot sauce on the side — adds it fresh during eating; liquid sauce inside = soggy
- Use parchment between the burrito and foil if you notice your foil sticking to the tortilla
- Label your burritos — if you’re making multiple variations (meat vs. veggie), a simple masking tape label saves confusion
- Don’t reheat the same burrito twice — once it’s been heated, eat it
How to Meal Prep Breakfast Burritos: Frequently Asked Questions
Q: Can I put salsa inside my meal-prepped breakfast burritos? A: It’s not recommended for storage. Salsa has a very high water content that will saturate the tortilla within hours. Use it as a dipping sauce or topping when you’re ready to eat.
Q: How long do breakfast burritos last in the fridge? A: Up to 4 days when wrapped properly in foil and stored in an airtight container. Beyond that, the texture declines noticeably even if they’re technically still safe to eat.
Q: Why does my tortilla get hard and dry on the edges after reheating? A: This happens when the burrito is reheated on high heat for too long, or without a moisture source. Use the damp paper towel method in the microwave, or use a covered skillet to trap a little steam while crisping the outside.
Q: Can I use corn tortillas instead of flour? A: Corn tortillas crack easily and don’t wrap as well for burritos. They also tend to dry out rather than get soggy, which is a different but equally unpleasant problem. Stick to flour for meal prep burritos.
Q: Is it okay to add cheese on top before reheating? A: Yes, and it’s actually a great idea. Adding a pinch of fresh shredded cheese on top before microwaving gives you melty cheese without relying solely on what’s inside the burrito.
Q: Can I meal prep breakfast burritos without eggs? A: Absolutely. Scrambled tofu, black beans, or extra potatoes work well as egg-free bases. The same moisture rules apply — cook everything dry, cool before wrapping, and store correctly.
Q: What’s the best way to reheat from frozen without a microwave? A: Wrap the frozen burrito in foil and place it in a 350°F oven for 25 to 30 minutes, flipping halfway through. It’s slower but produces a very even heat throughout.
Q: Do breakfast burritos freeze well with cheese inside? A: Yes, cheese freezes and reheats well inside a burrito. It may not be as melty after the freeze-thaw process, but it retains its flavor and helps with texture.
SUGGESTED POST >> 27 Meal Prep Veggie Ideas Worth Trying Now: For Busy Weeks