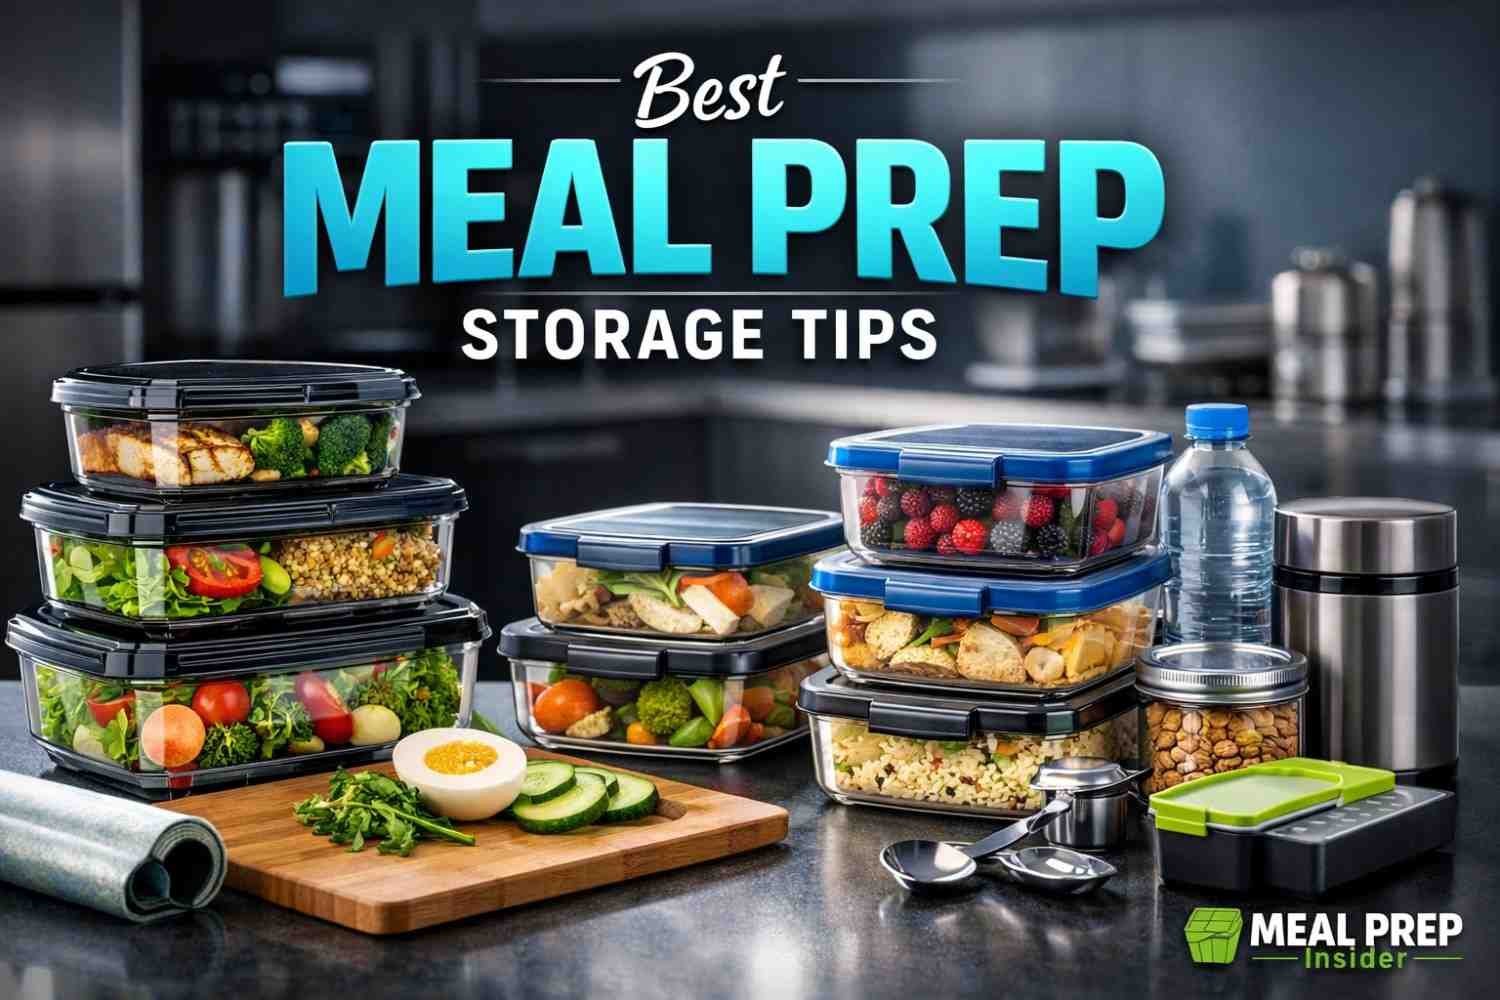
Master meal prep storage tips to keep your food fresh, safe, and flavorful for days. Learn the best containers, fridge organization, freezing techniques, and how long meal prep lasts so you save time and reduce waste.
Okay, I get it. You spent your entire Sunday chopping vegetables, cooking chicken, and portioning out meals for the week. You felt accomplished. Productive even. Then Wednesday rolls around, and that beautiful quinoa bowl you made looks like a science experiment gone wrong.
Been there. Done that. Got the moldy Tupperware to prove it.
The thing is, meal prepping isn’t just about cooking in bulk. The storage part? That’s where most people completely drop the ball. And honestly, it’s not your fault. Nobody teaches you this stuff. Your mom probably didn’t meal prep as we do now, and cooking shows definitely skip the “here’s how to store this for five days” part.
I learned this the hard way after wasting probably hundreds of dollars on food that went bad too quickly. But here’s the good news: once you figure out proper storage techniques, meal prep becomes genuinely sustainable. Not just for a week or two. For the long haul.
Why Storage Makes or Breaks Your Meal Prep Game
Here’s what nobody tells you when you start meal prepping. The cooking part is easy. Following a recipe? Simple enough. But keeping that food fresh, safe, and actually appetizing for days? That’s an entirely different skill set.
Temperature fluctuations mess everything up. Moisture ruins texture. Air exposure kills freshness. And if you’re stacking containers wrong, you’re basically asking for cross-contamination.
The average American throws away about 220 pounds of food per year. That’s roughly $1,800 down the drain. For a family of four, we’re talking serious money. And a huge chunk of that waste? It’s from improper storage.
The Real Cost of Bad Storage:
- Wasted groceries: $150-200 monthly for families
- Time lost remaking meals: 3-5 hours weekly
- Increased takeout spending: $300+ monthly
- Food poisoning risks: 48 million cases yearly in the US
Those numbers hit different when you think about them, right?
Choosing the Right Containers (This Part Matters More Than You Think)
I used to grab whatever containers were on sale. Big mistake. Huge.
Different foods need different containers. It’s not one-size-fits-all. Your leftover soup and your chopped vegetables shouldn’t be in the same type of storage situation.
Glass vs Plastic: The Eternal Debate
Glass containers are heavy. They’re breakable. They’re more expensive upfront. But man, they’re worth it for certain foods.
Plastic is lightweight and cheaper. Great for stuff you’re taking to work. But it stains, holds odors, and breaks down over time.
Here’s my honest take: you need both.
When to Use Glass:
- Tomato-based dishes (no staining)
- Foods you’ll reheat multiple times
- Acidic foods like citrus or vinegar-based meals
- Anything going in the oven
- Long-term freezer storage
When Plastic Works Fine:
- Dry snacks and nuts
- Chopped vegetables (short-term)
- Sandwiches and wraps
- Foods you’re eating within 1-2 days
- Gym or work lunches that might get tossed around
The Container Features That Truly Matter
Not all containers are created equal. Some features are marketing gimmicks. Others genuinely change the game.
Must-Have Features:
- Airtight seals (non-negotiable)
- Clear lids or bodies (so you see what’s inside)
- Microwave-safe materials
- Stackable design
- BPA-free certification
Nice-to-Have Features:
- Compartments for separated foods
- Removable dividers
- Vent options for microwave use
- Freezer-to-oven capability
- Built-in utensil storage
I’ve got containers from three years ago that still work perfectly. And I’ve had “premium” containers fail after two months. Brand matters, but so does how you use and maintain it.
The Temperature Danger Zone (Pay Attention Here)
The USDA isn’t messing around with their temperature guidelines. Between 40°F and 140°F, bacteria multiply like crazy. We’re talking doubling every 20 minutes under the right conditions.
Your meal prep needs to move through this danger zone quickly. Both when cooling down and when heating up.
The Two-Hour Rule
Cooked food shouldn’t sit at room temperature for more than two hours. In summer heat or if your kitchen is warm? Cut that to one hour.
I know you just finished cooking, and those containers are hot. I know you’ve heard you shouldn’t put hot food directly in the fridge. But here’s the thing: modern refrigerators can handle it. The old advice about not putting hot food in the fridge dates back to when refrigerators were less powerful.
Cooling Food Quickly:
- Spread food in shallow containers
- Use an ice bath for pots and pans
- Divide large batches into smaller portions
- Leave some space between containers in the fridge
- Don’t stack hot containers
One trick that changed everything for me? I prep in smaller batches. Instead of one giant container of rice, I portion it into meal-sized containers immediately. It cools faster, and I’m not repeatedly opening one big container all week.
Organization Systems That Don’t Fall Apart by Wednesday
You know what’s worse than bad storage? Good storage with zero organization.
I’ve watched people open their fridge and just stare. They prepped six different meals, but can’t remember which is which. Or they know what’s in there but can’t reach anything without unpacking half the fridge.
The Front-to-Back Method
Put the meals you’ll eat first at the front. Shocking concept, right? But most people don’t do it.
Monday’s lunch goes front and center. Friday’s dinner can hang out in the back. As you grab meals, the next one moves forward automatically.
Fridge Organization Zones:
- Top shelf: Ready-to-eat meals for the next 2 days
- Middle shelf: Meals for days 3-4
- Bottom shelf: End-of-week meals and meal components
- Door: Sauces, dressings, and condiments only
- Drawers: Fresh produce and ingredients
Label Everything (Yes, Everything)
I resisted labels for way too long. Felt unnecessary. Then I ate chicken that I thought was from Sunday but turned out to be from the previous Sunday.
You’d think you’ll remember. You won’t.
Get some masking tape and a marker. Or use a label maker if you’re feeling fancy. Write what it is and when you made it.
Essential Label Information:
- Meal name or main ingredient
- Date prepared
- Reheat instructions (if needed)
- “Use by” date
Some people use colored labels for different meal categories. Blue for breakfast, green for lunch, red for dinner. Whatever system makes sense to your brain.
Freezer Storage Strategies (The Long Game)
Your freezer is basically a time machine for food. Use it right, and you’ve got meals ready weeks from now.
Mess it up, and you’ve got freezer-burned garbage that tastes like the inside of an ice cube.
What Freezes Well (And What Doesn’t)
Not everything belongs in the freezer. I learned this after ruining perfectly good potato salad.
Freezer Champions:
- Cooked grains (rice, quinoa, farro)
- Soups and stews
- Cooked beans and legumes
- Cooked ground meat dishes
- Muffins and baked goods
- Cooked pasta (slightly undercooked works best)
- Casseroles
- Smoothie prep bags
Freezer Failures:
- Lettuce and raw leafy greens
- Cucumbers and celery
- Dairy-heavy sauces (they separate)
- Fried foods (get soggy)
- Mayonnaise-based dishes
- Eggs in shells
- Cream cheese frosting
Preventing Freezer Burn
Freezer burn isn’t actually dangerous. It just tastes terrible. And the texture becomes cardboard-like.
It happens when air touches your food. That’s it. That’s the whole problem.
Freezer Burn Prevention:
- Remove as much air as possible from containers
- Use freezer-specific bags or containers
- Wrap foods in plastic wrap before putting them in containers
- Don’t leave empty space in containers (fill to the top)
- Keep your freezer at 0°F or below
I double-wrap anything I’m freezing for more than two weeks. Takes an extra minute but saves the meal.
The Flat-Freezing Method
This changed my freezer game completely. Instead of freezing soups and sauces in bulky containers, freeze them flat in heavy-duty freezer bags.
Pour your soup into a gallon freezer bag. Seal it almost completely, then push out all the air. Seal it the rest of the way. Lay it flat on a baking sheet and freeze. Once frozen, you can stack these flat packs like books.
They thaw faster. They take up less space. You can break off portions if you don’t need the whole thing.
Portion Control and Container Sizing
Getting portions right saves money and helps with actual nutrition goals. Too much food in a container and you’re either overeating or wasting food. Too little and you’re hungry two hours later.
The Standard Portion Guidelines
I’m not saying you need to follow these exactly. But they’re a decent starting point.
Balanced Meal Portions:
- Protein: 4-6 ounces (about palm-sized)
- Grains/starches: 1/2 to 1 cup
- Vegetables: 1-2 cups
- Healthy fats: 1-2 tablespoons
- Sauce or dressing: 2-4 tablespoons
Most people underestimate vegetables and overestimate everything else. If your meal prep container is half vegetables, you’re probably doing it right.
Container Size Chart
| Container Size | Best For | Meal Type |
|---|---|---|
| 1-cup | Snacks, dressings, side dishes | N/A |
| 2-cup | Light lunches, breakfast bowls | Single component meals |
| 3-cup | Standard lunches, small dinners | Most adult meals |
| 4-cup | Large meals, family-style portions | Hearty dinners |
| 6-cup+ | Bulk storage, sharing | Multiple servings |
I use 3-cup containers for probably 70% of my meal prep. They’re the sweet spot for most people.
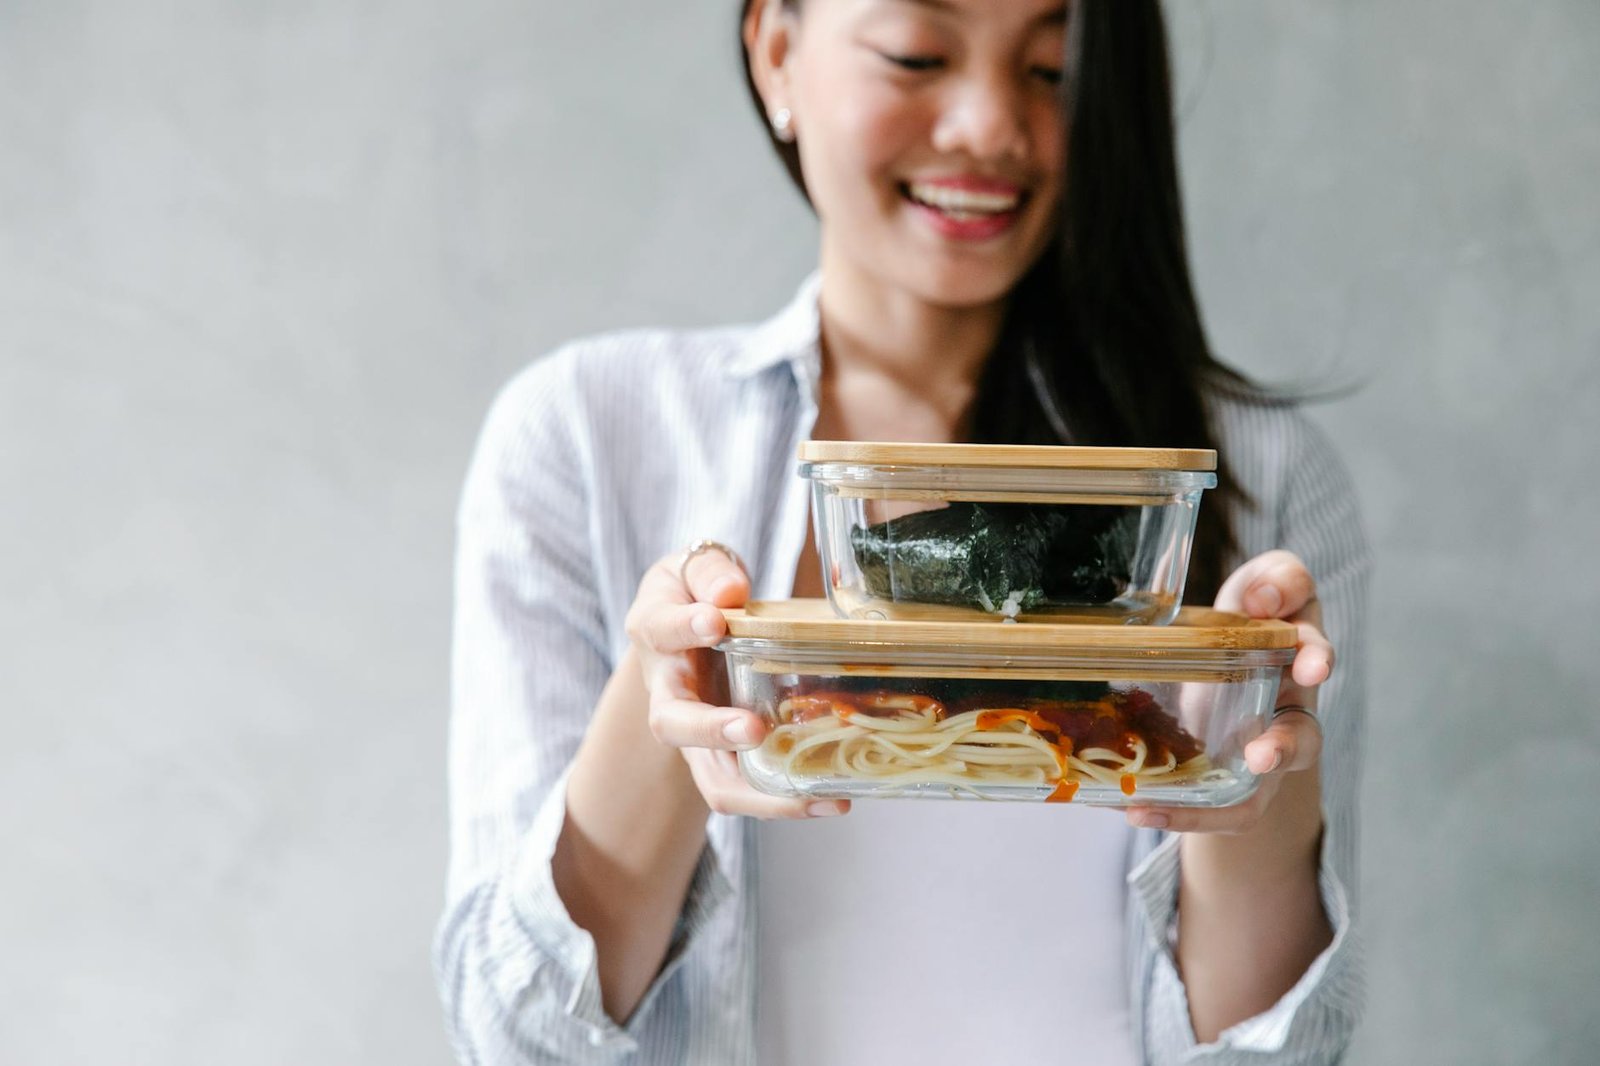
Ingredient Separation Techniques
Some foods don’t play well together. Lettuce gets wilted by warm weather. Dressing makes everything soggy. Crispy toppings become sad and limp.
The Assembly-Required Approach
Store components separately and combine them when you’re ready to eat. Takes slightly more time, but the quality difference is massive.
What to Keep Separate:
- Dressings and sauces
- Crunchy toppings (nuts, seeds, croutons)
- Fresh herbs
- Lettuce and greens
- Avocado slices
- Anything fried
I keep small 2-ounce containers for dressings and sauces. The little ones you get for takeout work perfectly if you save them.
The Mason Jar Salad Method
If you haven’t tried this, you’re missing out. But there’s a specific order you need to follow.
Mason Jar Salad Layering (bottom to top):
- Dressing
- Hard vegetables (carrots, cucumbers, peppers)
- Proteins (chicken, beans, cheese)
- Soft vegetables (tomatoes, avocado)
- Grains or pasta
- Leafy greens
- Crunchy toppings
The dressing stays at the bottom, separated from the greens. When you’re ready to eat, shake it up or dump it into a bowl. The salad stays fresh for 3-4 days this way.
RELATED POST >> How to Meal Prep Breakfast Sandwiches [Freezer-Friendly]
Maximizing Shelf Life for Different Food Types
Different foods have different storage needs. Treating everything the same is where people mess up.
Proteins
Cooked chicken lasts 3-4 days in the fridge. Ground meat dishes last about the same. Fish? You’re looking at 2-3 days max.
If you’re prepping for a full week, freeze anything you won’t eat in the first three days. It’s not worth the risk of food poisoning.
Protein Storage Tips:
- Store in the coldest part of your fridge (usually the back of the bottom shelf)
- Keep separate from vegetables
- Add a paper towel to absorb excess moisture
- Freeze after day 2 if you won’t eat it immediately
Vegetables
Raw-cut vegetables last much less time than whole vegetables. Once you cut them, the clock starts ticking faster.
Vegetable Prep and Storage:
- Store in airtight containers with a dry paper towel
- Keep leafy greens in produce bags with air holes
- Store tomatoes at room temperature until cut
- Keep onions and peppers separate (they release gases that affect each other)
Blanching vegetables before freezing keeps them from getting mushy. Boil them for 2-3 minutes, then immediately plunge them into ice water. Drain, dry, and freeze.
Grains and Starches
Rice and quinoa can last 4-5 days if stored properly. Pasta is about the same.
The trick? Let them cool completely before sealing the container. Any residual heat creates condensation, and condensation creates the perfect environment for bacteria.
I spread cooked grains on a baking sheet to cool them quickly. Once they’re room temperature, into containers they go.
Common Storage Errors (And How to Fix Them)
I’ve made every mistake in the book. Let me save you the trouble.
Overpacking Containers
Stuffing containers to the absolute brim might seem efficient. It’s not. Food needs a tiny bit of space, especially if it’s going in the freezer (liquids expand when frozen).
Leave about half an inch of space at the top. That’s it. Just that little bit makes a difference.
Using Damaged Containers
That container with the slightly cracked lid? The one that doesn’t seal quite right anymore? Toss it.
I know it seems wasteful. But using compromised containers leads to spills, contamination, and food going bad faster. It’s a false economy.
Ignoring the Sniff Test
Dates are guidelines. Your nose is the real test.
If something smells off, trust your instincts. Doesn’t matter if it’s only day three. Doesn’t matter if it “should” still be good. Your prehistoric brain knows what spoiled food smells like.
Storing Hot and Cold Foods Together
Putting warm containers directly next to refrigerated ones raises the temperature of the cold food. This pushes everything into that danger zone we talked about earlier.
Cool everything before it goes in the fridge. Or at least keep hot and cold separated until temperatures stabilize.
Advanced Strategies for Serious Preppers
Once you’ve got the basics down, these techniques take things to the next level.
Vacuum Sealing
Vacuum sealers remove all the air from storage bags. This extends freezer life significantly. We’re talking months, not weeks.
They’re not cheap (decent ones start around $80-100). But if you’re serious about long-term storage or buying in bulk, they pay for themselves.
Best Uses for Vacuum Sealing:
- Bulk meat purchases
- Sous vide meal prep
- Long-term freezer storage
- Marinating (the vacuum helps flavors penetrate faster)
The Ice Cube Tray Hack
Freeze sauces, pesto, broth, herbs in oil, or smoothie additions in ice cube trays. Once frozen, pop them out into a freezer bag.
Now you’ve got perfectly portioned flavor bombs ready to go. Need pesto for pasta? Grab two cubes. Want to add greens to a smoothie? Three cubes of frozen spinach.
Each standard ice cube is about 2 tablespoons. Easy math for recipes.
Sous Vide and Refrigeration
If you sous vide cook, you can seal and refrigerate meals for up to two weeks. The vacuum-sealed environment and precise cooking temperatures make this safe.
This is next-level meal prep. Cook everything on Sunday, store it sealed, and just reheat in hot water throughout the week. The texture stays perfect.
Reheating Without Ruining Everything
You stored everything perfectly. Now don’t mess it up by reheating it wrong.
Microwave Best Practices
Not all foods microwave well. But if you’re doing it anyway, do it right.
Microwave Reheating Tips:
- Add a splash of water or broth to prevent drying
- Cover with a damp paper towel
- Use 50-70% power for more even heating
- Stir halfway through
- Let it sit for a minute after heating (heat continues to distribute)
Rice dries out like crazy in the microwave. Add a tablespoon of water and cover it. Makes a huge difference.
Stovetop Reheating
Takes longer but gives better results for most foods.
Best Stovetop Reheating Methods:
- Add food to a pan with a tiny bit of oil or water
- Use medium-low heat
- Stir frequently
- Cover to trap moisture
- Add fresh herbs or seasonings at the end
Stir-fries, grain bowls, and saucy dishes all benefit from stovetop reheating.
Oven Reheating
For casseroles, baked dishes, or anything you want crispy, the oven is your friend.
Preheat to 350°F. Cover with foil to prevent drying out. Remove the foil for the last 5-10 minutes if you want the top crispy.
Seasonal Storage Considerations
Summer and winter storage challenges are completely different.
Summer Storage Challenges
Your kitchen is hotter. Your fridge works harder. Food spoils faster.
Summer Strategies:
- Prep smaller batches (3-4 days instead of 7)
- Use insulated bags for transport
- Keep ice packs in the freezer for lunch boxes
- Monitor fridge temperature (should stay at 37-40°F)
- Consider prepping twice weekly instead of once
Winter Storage Advantages
Cold weather means more options. Your garage might be cold enough to store extra drinks or non-perishable items. You can cook heartier meals that keep well.
Soups, stews, and casseroles are perfect for winter prep. They actually taste better after a day or two.
Food Safety Guidelines You Can’t Ignore
I’m not trying to scare you. But food poisoning is genuinely awful. And preventable.
The Critical Temperatures
| Food Type | Safe Internal Temp | Refrigerator Life | Freezer Life |
|---|---|---|---|
| Chicken/Turkey | 165°F | 3-4 days | 4-6 months |
| Ground Meat | 160°F | 3-4 days | 3-4 months |
| Beef/Pork/Lamb | 145°F | 3-5 days | 4-12 months |
| Fish | 145°F | 2-3 days | 2-6 months |
| Egg dishes | 160°F | 3-4 days | 2-3 months |
| Cooked vegetables | N/A | 3-5 days | 8-12 months |
| Rice/Grains | N/A | 4-5 days | 6-8 months |
Cross-Contamination Prevention
Raw and cooked foods need to be kept separate. Always.
Cross-Contamination Rules:
- Store raw meat on the bottom shelf (so it can’t drip)
- Use separate cutting boards for raw meat
- Wash your hands between handling different foods
- Clean containers thoroughly between uses
- Never use the same utensil for raw and cooked food
I use color-coded cutting boards. Red for meat, green for vegetables, and yellow for cooked foods. Makes it impossible to mix them up.
Budget-Friendly Storage Solutions
You don’t need to spend hundreds on containers. But you do need to spend smart.
Where to Invest
Worth the Money:
- A set of quality glass containers (6-8 pieces)
- One good knife for prep work
- Durable freezer bags
- A kitchen scale for portions
- A reliable food thermometer
Save Money Here:
- Plastic containers for dry goods (cheap ones work fine)
- Labels (masking tape and a marker cost $3)
- Ice cube trays (dollar store versions work great)
- Mason jars (often cheaper at hardware stores than kitchen stores)
DIY Storage Hacks
Reuse glass jars from pasta sauce, pickles, or salsa. They’re free and work perfectly for overnight oats, salad dressings, and dry goods.
Yogurt containers with lids make decent storage for small portions. Clean them well, and they’ll last months.
Bread bags work for storing baked goods. Better than plastic wrap and reusable.
Making Storage Habits Stick
Knowledge is one thing. In reality, putting it into practice is different.
The Sunday Setup
I block off three hours every Sunday. Not all of it is cooking. A good chunk is organizing my storage system.
Sunday Storage Routine:
- Empty and wipe down fridge shelves
- Check and toss anything expired
- Wash all containers from the previous week
- Reorganize freezer
- Make labels for the week ahead
- Prep storage containers alongside cooking
This routine became automatic after about a month. Now it feels weird when I skip it.
The Mid-Week Check
Wednesday evening, I do a quick fridge audit. Takes maybe 10 minutes.
Wednesday Check:
- Move end-of-week meals forward
- Check what needs to be eaten ASAP
- Assess if I need to freeze anything
- Prep any fresh additions for later meals
- Wipe down any spills or condensation
This prevents the weekend panic of finding mystery containers in the back of the fridge.
Troubleshooting Common Issues
My Food Gets Soggy
Moisture is escaping from your food and getting trapped in the container. Add a paper towel to absorb excess moisture. Or store wet and dry components separately.
Everything Tastes Like Freezer
You’ve got freezer burn. Better wrapping and removing air will fix this. Also, check that your freezer maintains a steady 0°F.
My Containers Stain and Smell
Tomato-based and curry dishes are the worst for this. Spray containers with cooking spray before adding food. Or switch to glass for these meals. Baking soda paste can remove many stains and odors.
Food Dries Out
You’re either reheating wrong or not sealing containers properly. Add moisture when reheating. Check that your container seals are intact.
The Real Talk About Meal Prep Storage
Here’s the thing nobody mentions in those perfect Instagram posts. Meal prep storage isn’t always Instagram-worthy. Sometimes your containers don’t match. Sometimes your lettuce wilts a bit by day four. Sometimes you freeze something that really didn’t freeze well.
That’s okay. You’re learning.
The goal isn’t perfection. It’s having food ready when you need it. It’s saving money and time. It’s eating healthier because you planned ahead.
I still mess up. Last week, I forgot to label three containers and played a fun game of “guess what’s in here” on Thursday. The week before, I stored cucumbers in the freezer (don’t do this, by the way).
But overall, having these systems in place changed how I eat. I waste less food. I spend less money on takeout. I eat more vegetables because they’re already prepped and stored properly.
Storage isn’t the exciting part of meal prep. Cooking new recipes is more fun. Trying different flavors is more interesting. But storage is what makes the whole system sustainable.
Get the storage right and everything else falls into place. Mess up the storage, and even the best-cooked meals end up in the trash by Wednesday.
Start simple. Get a few good containers. Learn what foods you eat most often. Figure out what freezes well for you. Build from there.
Your future self will thank you when you open the fridge on a busy Tuesday and find everything fresh, organized, and ready to eat.
Meal Prep Storage Tips: FAQs
How long can I safely keep meal-prepped food in the refrigerator?
Most cooked foods last 3-4 days in the refrigerator when stored properly at 37-40°F. Fish is shorter at 2-3 days, while some vegetables can last up to 5 days. When in doubt, freeze portions you won’t eat within three days.
Can I freeze meals in plastic containers?
Yes, but use containers specifically labeled as freezer-safe. Regular plastic containers can crack or become brittle in freezer temperatures. Leave about half an inch of space at the top since liquids expand when frozen.
Should I let food cool before refrigerating?
Food should cool to room temperature within two hours of cooking, but you don’t need to wait that long before refrigerating. Modern refrigerators can handle warm food. Divide large batches into smaller containers to speed cooling and get food out of the temperature danger zone (40-140°F) faster.
Why does my meal prep taste different by the end of the week?
Flavors continue developing during storage. Some spices intensify while fresh herbs lose flavor. Textures also change as moisture redistributes. Store sauces separately, add fresh ingredients at serving time, and consider freezing half your batch to maintain better quality.
What’s the best way to prevent freezer burn?
Remove as much air as possible from storage containers or bags. Use freezer-specific storage products, wrap foods in plastic wrap before containerizing, and maintain your freezer at a constant 0°F or below. Double-wrapping helps for long-term storage beyond two weeks.
How do I know if my meal-prepped food has gone bad?
Trust your senses. Spoiled food often has an off smell, visible mold, slimy texture, or unusual color changes. If anything seems questionable, throw it out. Don’t taste food to test freshness—your nose is a better indicator than your taste buds.
Can I meal prep for two weeks at once?
Yes, but freeze anything beyond four days. Cook and portion everything, refrigerate meals for the first 3-4 days, and freeze the rest. This works well if you prep twice monthly rather than weekly. Label everything clearly with prep dates.
What containers are worth the investment?
Glass containers with airtight lids are worth buying for foods that stain (tomato-based), acidic ingredients, and anything you’ll reheat multiple times. They last for years if handled carefully. Good-quality plastic containers work well for dry goods, snacks, and short-term storage. Buy both types based on your specific needs.
SUGGESTED POST >> Aldi Meal Prep Ideas on a Budget: $50 Weekly Frugal Plan